
Installation day makes first-time clients nervous. Trucks arrive, dirt starts flying, your yard transforms into a work zone. You’re not sure where to stand, what to ask, whether offering coffee is helpful or just gets in the way.
Here’s what actually happens, hour by hour, so you know what’s normal versus what needs your attention.
Before Installation Day: Your Essential Checklist
Preparation converts chaos into smooth routine. Handle these 48 hours ahead, not the morning of.
Confirming Details with Your Contractor
Review the estimate one week before installation. Confirm start time—usually 7 or 8 AM. Ask how many crew members to expect, verify material quantities and colors match what you ordered. Get backup rain dates now instead of scrambling later.
Marking Property Lines and Utilities (Call 811!)
State law requires utility locates 72 hours minimum before anyone digs. Call 811—it’s free, it’s required, it prevents disasters. Painted lines show where gas, water, electric, cable, and phone lines run underground.
Skip this and you’re liable for repairs. Severed gas lines cost thousands, shut down neighborhoods, make local news in ways you really don’t want.
Clearing the Fence Line and Access Points
Remove everything from a 4-foot corridor along the entire fence path. Furniture, plants, toys, garden gnomes, that pile of lumber you’ve been meaning to deal with—move it all. Gate installation needs 10-foot swing clearance minimum.
Trim tree branches below 7 feet so panels don’t fight foliage. Clear driveway access for trucks hauling materials.
Notifying Neighbors (Optional but Recommended)
Share the installation schedule with adjacent neighbors. Noise starts early, dust travels, trucks block parts of the street temporarily. A heads-up maintains good relations and prevents complaint calls to the city.
Securing Pets and Children
Keep dogs kenneled or indoors. Kids stay inside or away from the work zone entirely. Open post holes, power tools, heavy materials, moving equipment—too many hazards for curious pets and children.
Safety’s not negotiable here.

The Arrival: What Happens
When the Crew Shows Up
Trucks pull in typically between 7-8 AM. Professional outfits start with introductions, not just unloading and digging.
Introduction and Final Review of the Plan
Lead installer walks the fence line with you. Confirms fence design, exact height, gate locations, any custom elements. Now’s the time to speak up about changes—not after posts are set.
Sign off on the final plan. This protects both parties.
Material Delivery and Staging
Pallets of panels, posts, bags of concrete, hardware unload near the work zone. Vinyl fence materials arrive bundled and wrapped. Wood stacks flat to prevent warping before installation. Everything stages for efficient access without constant truck trips.
Good crews organize materials logically. Helps them work faster.
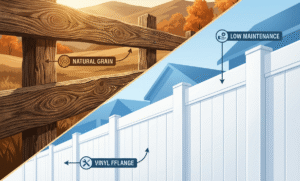
Choosing materials? Wood vs. vinyl fence guide
Initial Site Preparation and Measurements
String lines snap tight between corner stakes marking the fence path. Laser levels ensure everything runs straight—within 1/4 inch tolerance over long runs. Spray paint marks post hole locations every 6-8 feet.
Precision now prevents crooked sections later.
Document everything:
Snap photos of marked utility lines before digging starts. One picture resolves disputes instantly if painted marks get obscured.

The Installation Process: Step-by-Step Breakdown
Professional crews follow proven sequences. You’ll see the same pattern whether it’s wood, vinyl, or chain link.
Digging Post Holes: Methods and Considerations
Gas-powered augers bore 8-10 inch diameter holes, 30-36 inches deep depending on frost line requirements. Rocky soil switches to hydraulic breakers or hand tools when augers bind. Holes space 6-8 feet apart for standard fence sections.
This stage is loud. Expect serious noise for 2-4 hours depending on soil conditions and fence length.
Setting Posts: The Foundation of Your Fence
Posts drop into holes, get checked for plumb with levels, braced temporarily. Concrete mix fills voids around each post and crowns slightly above grade to shed water away from wood.
Initial set takes 4 hours minimum before posts can handle stress. Full cure needs 24-48 hours, but crews can often proceed carefully with rails after the initial set if they’re experienced.
North Dakota guide: Post depth, frost heave, and wind load
Installing Fence Panels/Pickets: Bringing Your Vision to Life
Horizontal rails attach to posts first—usually 2-3 rails depending on fence height. Prefab panels lift into brackets for vinyl or aluminum installations. Wood pickets nail individually when you want custom spacing or design.
This is where the fence starts looking like an actual fence instead of random posts in your yard.
Gate Installation and Hardware
Hinges lag into posts with heavy-duty bolts—usually 3/8 inch diameter minimum. Gates need perfect alignment or they’ll sag and bind. Self-closing mechanisms get adjusted for smooth operation without slamming.
Latches align at exact heights for comfortable operation. Test everything before the crew calls it done.
Handling Obstacles and Unexpected Issues
Tree roots force post locations to shift 6 inches left or right. Slope changes trigger step-down panel designs. Underground boulders that weren’t obvious during estimates require different solutions.
Good crews solve these on-site without constant owner consultations. They’ve seen these problems before.

During Installation: How to Be a Good Client
Supporting the crew speeds work without getting in the way. Small actions matter more than you’d think.
Communication is Key: When and How to Ask Questions
Approach the lead installer only—one point of contact prevents confusion. Text minor concerns instead of interrupting mid-task. Questions about gate height or panel alignment? Ask. Curiosity about what drill bit they’re using? Wait.
Avoid interruptions during critical tasks like setting posts plumb or aligning gates.
Providing Access to Facilities (Restrooms, Water)
Offer bottled water on hot days—crews appreciate it. Bathroom access makes everyone more comfortable. Larger commercial jobs bring portable restrooms, but residential projects usually don’t.
Simple hospitality goes far.
Respecting the Crew’s Work
Stay 10 feet back from active work zones. Hard hats protect professionals who know the risks. Observers without PPE shouldn’t be close to swinging materials or power tools.
Watch from the deck or window if you’re curious. Supervising from 3 feet away just creates liability.
Time Block | Activity | Your Role |
7-9 AM | Arrival & Digging | Clear up final questions |
9 AM-12 PM | Post Setting | Provide water/shade access |
12-1 PM | Lunch Break | Give crew quiet space |
1-4 PM | Panels & Gates | Approve final details |
4-5 PM | Cleanup & Walkthrough | Inspect thoroughly |
After Installation: The Final Touches and Beyond
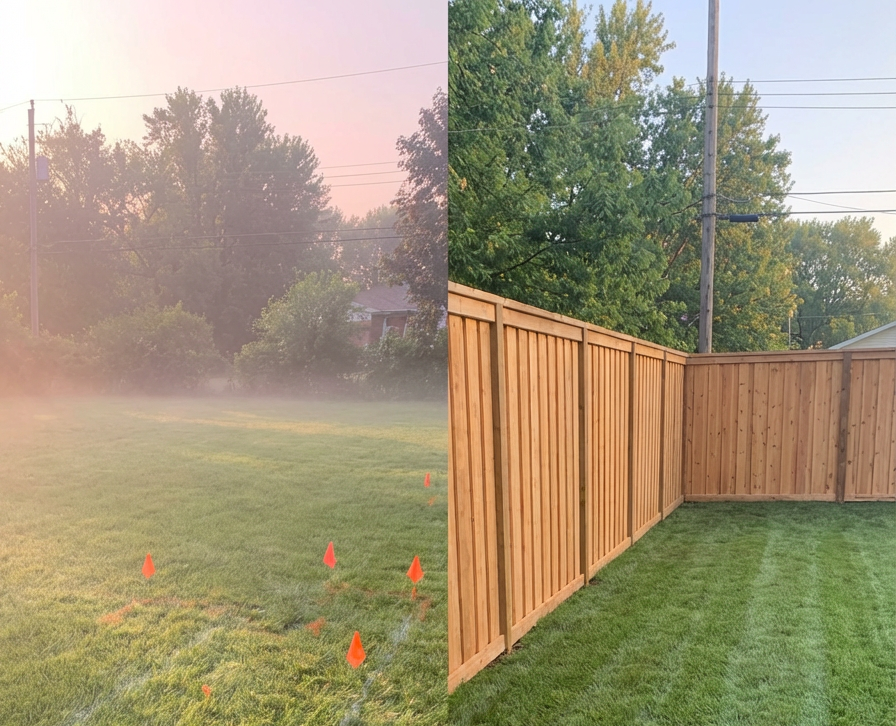
Most 150-foot residential fence projects wrap by 4-5 PM if everything goes smoothly.
The Final Walkthrough: Inspecting Your New Fence
Walk the entire fence line with the lead installer. Check posts for plumb, panel gaps under 1/4 inch, smooth gate operation. Test latches from both sides. Note any issues on a punch list for immediate correction.
Don’t sign off until you’re satisfied. This is your last chance for free fixes.
Understanding Maintenance and Warranty
Wood fences need annual sealing or staining to prevent rot and weathering. Vinyl just needs occasional power washing—maybe quarterly in dusty areas.
Warranties typically cover material defects and workmanship for 1-5 years depending on contractor and materials. Read the actual warranty document, not just the summary. Know what’s covered versus what voids coverage.
Payment and Closing Remarks
Final invoice should match the original estimate minus any deposit already paid. Change orders for additional work get documented separately. Most contractors take checks, cards, or digital payment.
Get copies of everything—invoice, warranty, permit sign-off if required.
Final test: Check gate latches at child height before the crew leaves. Adult height feels fine, but kids struggle with latches positioned for 6-foot-tall installers. One quick adjustment now prevents daily frustration.
For design inspiration, warranty details, and contractor selection guidance, research licensed fence companies in your area with verified reviews and proper insurance.
Conclusion
Professional fence installation transforms yards in 8-10 hours for typical residential projects. Preparation eliminates most stress. Clear communication handles the rest.
You gain privacy, security, improved property aesthetics, and defined boundaries—all without major disruptions if you plan properly.
Timeline and Value Expectations
While fence installation doesn’t dramatically spike property value, completed projects improve functionality and marketability. Industry data shows fence ROI typically ranges 30-70% of installation costs.
According to Angi, the average return on investment (ROI) for installing a fence usually ranges between 30% and 70% of the installation cost. This means that if you spend $3,200 on a fence, you might expect to see around $950 to $2,400 added to your home’s appraised value. Redfin
More importantly, good fences help homes sell faster and appeal to buyers with pets, children, or privacy concerns.
Choose licensed, insured contractors with detailed contracts covering timelines, materials, warranties, and cleanup procedures.
Transparent communication from estimate through final walkthrough indicates professional operations.

Frequently Asked Questions
Some disruption happens—trucks drive on grass, post holes leave dirt piles, foot traffic wears paths. Professional crews use tarps and plywood to minimize damage. Ruts fill with topsoil and seed, recovering within weeks. Spring installations recover faster than summer or fall.
Expect minor lawn repair after installation. Budget for grass seed or sod if you're particular about the lawn.
Reputable contractors monitor forecasts closely and reschedule proactively rather than showing up to work in rain. Most reschedule within 48-72 hours at no additional cost.
Rain stops concrete work and makes post-hole digging miserable. Light drizzle might not halt installation, but steady rain definitely does. Cold weather below 40°F complicates concrete curing.
Your presence helps for quick approvals and decisions if issues arise. But you don't need to hover. Check in periodically, stay available for questions, otherwise continue your day.
Remote monitoring works too—video calls for approvals handle busy schedules. Just make sure someone's available to unlock gates, answer questions, provide facility access.
Walk alongside it immediately—it's stable once panels attach. But avoid stressing gates or hanging heavy decorations until concrete fully cures—48 hours minimum for practical strength, longer for complete cure.
Don't let kids climb it the first week. Concrete might look set but hasn't reached full strength yet.